Guadalupe Great White Shark 21

Guadalupe Great White Shark 21

Posted on

Over the last few weeks, I have been diligently working on processing images from the trips that I have never edited in the last 4 years. I am never home long enough to catch up, plus I really dislike processing images. I have probably gone through at least 50,000 images and deleted many of them, but I have also discovered many fantastic images that have been lurking on my hard-drives. At the time, I remember being disappointed in some of these trips, but I am glad that time has allowed me to realize the potential of what I did photograph. Also, my image processing skills have greatly improved over what I was capable of a few years ago.

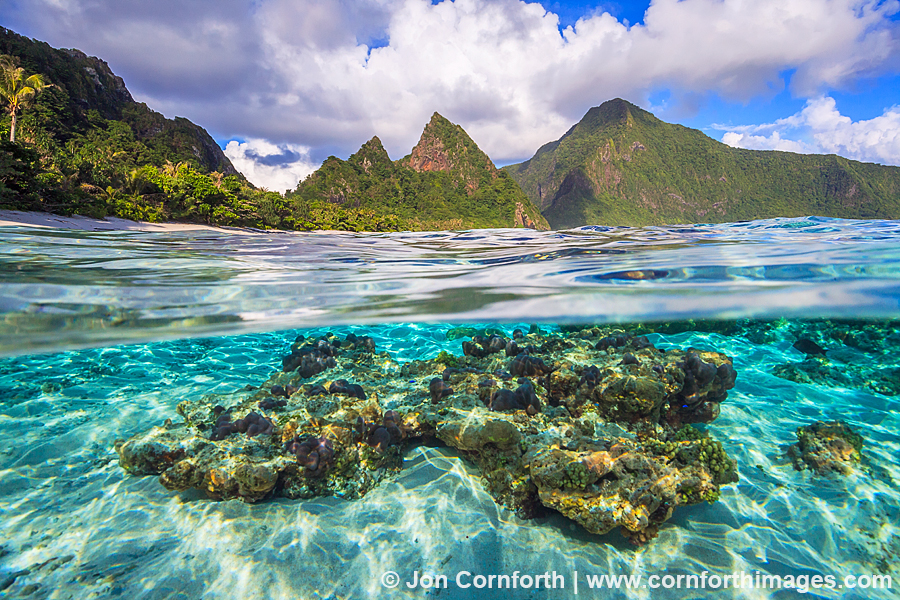
For example, consider this dramatic image of a great white shark that I photographed at Isla Guadalupe off the coast of Baja, Mexico in September 2008. This is a fine image, but at the time all that I remembered was feeling disgruntled that I never got the head-on, jaws open picture that every shark photographer dreams of. I also was not very good at processing blue underwater images at that point, so I could not see the possibilities of this image through the overpowering blue of the RAW file. The fish that surrounded the shark cage also “ruined” my picture, but now they do not bother me nearly as much as they did at the time. I have been fortunate to have photographed great white sharks twice in my lifetime. This image has gotten me thinking again about doing some more shark diving trips in the near future. I created this image using my Canon 5D and 17-40mm f4 lens in my old Ikelite 5DmkII housing with 8″ dome port. It is a single exposure which was mostly processed using Aperture 3.0. I also removed much of the cyan cast and cloned out particles floating in the water using Photoshop CS5.

Be social and share.

Kua Bay Shorebreak 1

Kua Bay Shorebreak 1

Posted on

While I was in Hawaii in February, I spent more time photographing shore break waves. It’s a lot of fun waiting for a big set to come in and amazing how fast 3-4 hours goes by. I’ve photographed in much more extreme environments, but never in a place where I get pummeled by my subject. This is my favorite tube from my efforts to date. I love the tube slamming shut and the light coming through the wave on to the shallow sandy bottom. My biggest limitation at this point (other than not living in Hawaii!) is that my camera only shoots 4fps. If I shoot video at 30fps and slow the action down, I can see all the images that I am not getting. In order to continue my wave photography ambitions, I am considering purchasing the new Canon 1DX which shoots at 12fps. I created this image with my Canon 5DmkII and 14mm f2.8 lens inside my Aquatech 5DmkII housing with a Aquatech 8″ dome port. This image is a single-exposure which required a minimal amount of processing using Aperture 3 and Photoshop CS5.

Be social and share.

Ofu Island Over Under 2

Ofu Island Over Under 2

Posted on

My regular readers have probably noticed that I have been on an extensive underwater photography binge in the last year. I’ve always said that I aspire to shoot mostly underwater subjects, and am happy that most of my 2012 trips will be at or below the surface. So sticking with that theme, here is another underwater image from my December trip to the National Park of American Samoa. I spent a week at the Vaoto Lodge on Ofu Island and had this idyllic beach setting all to myself each day. This is my favorite over-under image from all the time that I spent in the water. I really like how the coral rubble in the sandy bottom leads the viewer’s eye directly into the jagged peaks. I created this image with my Canon 5DmkII and 17-40mm f4 lens with a B+W +2 graduated neutral density filter inside my Aquatech 5DmkII housing with an Aquatech 8″ dome port. This image is a single-exposure which required a minimal amount of processing using Aperture 3 and Photoshop CS5.

Be social and share.

Manatee 5

Manatee 5

Posted on

During my week long visit to Crystal River, I spent close to 36 hours in the water with the mantees. In that amount of time, I was only able to photograph this one moment where a manatee playfully rolled upside down asking me to rub its belly. If I spend enough time with wild animals, eventually I am able to photograph a unique moment or behavior. This beautiful portrait shows how blissful the manatees can be when they are not being pursued by tons of tourists in the water. We should all aspire to exhibit such joy and trust. I created this image using my Canon 5DmkII and 17-40mm f4 lens with a +3 diopter in my Ikelite 5DmkII housing with 8″ dome port. This image is a single exposure which was mostly processed using Aperture 3.0. I also cloned out particles floating in the water using Photoshop CS5.

Be social and share.

Manatee 8

Manatee 8

Posted on

Manatees are so ugly that they are adorable. This picture clearly illustrates that point. I spent hours in the water waiting for a manatee to pose for me like this. Whenever I photograph wild animals, I do not chase after or harass them. I can never force a picture to happen. That is why I wait patiently for them to reveal themselves to me. Eventually, an animal will become comfortable with my presence and I will be able to photograph a beautiful portrait like this. This manatee was actually nibbling on my toes, so it let me know that it was very friendly and curious. With my permit from the USF&WS, I was able to gently drop down to the bottom and allow the manatee to swim right up to my camera. I created this image using my Canon 5DmkII and 17-40mm f4 lens with a +3 diopter in my Ikelite 5DmkII housing with 8″ dome port. This image is a single exposure which was mostly processed using Aperture 3.0. I also cloned out particles floating in the water using Photoshop CS5.

Be social and share.

Manatee 1

Manatee 1

Posted on

I have just returned from photographing West Indian manatees at Crystal River State Park, Florida. It was a very interesting experience. I am usually the only photographer, let alone person, at the wilderness locations that I typically photograph. I knew that was not going to be the case with the rampant manatee exploitation at Crystal River, but I was totally unprepared for how many people, boats, and kayaks were in the water. Fortunately, I bumped into National Geographic photographer Paul Nicklen who gave me a nice referral to the USF&WS so that I could get a special use permit. The permit did not solve my problem of all the people in my pictures harassing the manatees, but it did give me some special access and the ability to sink down to the bottom in order to shoot up towards the surface. My other challenge was giving myself a mild case of hypothermia by spending over 6 hours each day in the 70° water. I could barely hold my camera by the time that I got out of the water. However, through my diligence I was able to photograph some fantastic encounters with curious manatees when no one else was around. This is one of my favorite images from my ordeal. I really like how this manatee posed for me and even put its flippers together as if it were praying. I created this image using my Canon 5DmkII and 17-40mm f4 lens with a +3 diopter in my Ikelite 5DmkII housing with 8″ dome port. This image is a single exposure which was mostly processed using Aperture 3.0. I also cloned out particles floating in the water using Photoshop CS5.

Be social and share.

Hamoa Beach Shorebreak 1

Hamoa Beach Shorebreak 1

Posted on

Like most photographers, I like to challenge myself to create new images outside of my comfort zone. One of my favorite new shooting styles is photographing breaking shore waves. This style has been made popular in the last few years by Clark Little. I harbor no illusions that I am going to become as well known or specialized as Clark is at photographing waves, but I had a lot of fun trying during my recent visit to Hawaii.

I am fairly competent with an underwater camera housing, and I have done some boogie boarding during my lifetime, but it took a lot of dedication to fling myself into a breaking wave with my large housing in hand. I got thrown through the air and pummeled by waves more than you can imagine. My camera housing turned into a dangerous weapon during the out-of-control punishment inflicted by the larger and more photogenic waves. During one of my more memorable moments, I received a big gash to my right shoulder when my housing hit the bottom while I was cartwheeling through the water. I’m lucky that it did not hit my face. I shot several thousand terrible wave images that were almost immediately deleted. However, this fantastic wave breaking at Hamoa Beach near Hana is the most impressive from all my effort. I really like how I not only captured the breaking tube, but the wave momentarily looks like some type of prehistoric monster. I also like how I framed the entire composition in my normally recognizable wide-angle style. There is no doubt that I if I want to improve that I will need a camera that is capable of 10-12fps, rather than my 5DmkII’s inadequate 4fps. I also stressed myself out so much doing this, that I suffered 2 back-to-back migraine headaches. In spite of all the challenges, photographing waves is very addictive and I can not wait to do it again. I created this image with my Canon 5DmkII and 17-40mm f4 lens inside my Aquatech 5DmkII housing with a Aquatech LP-VWZ  flat port. This image is a single-exposure which required a minimal amount of processing using Aperture 3, but I had to clone out a few water spots that were on my flat port using Photoshop CS5.

Be social and share.

Ofu Island Coral Over Under 1

Ofu Island Coral Over Under 1

Posted on

I spent much of my visit to the US National Park of American Samoa on Ofu Island photographing over-underwater split images. This is one of my favorites. I like the coral reef with the refracted light dancing across the sandy bottom below with the dramatic scenery and clouds above. There are even a few tropical fish visible in the original, though, I doubt any of my readers will be able to see them at this resolution. Creating an image like this required a lot of trial and error. Waves were constantly washing over the front of my dome, so I had to remove the water drops with a hand towel which I kept underneath a ballcap on my head. I’m glad that I had the whole beach to myself as I must have looked like a dork, but it got the job done. It was also really hot. Most of the Samoans stayed in the shade during the hottest part of the day, but I was out there swimming with my camera under the intense sun getting thoroughly sunburned. But it was fun. I created this image with my Canon 5DmkII and 17-40mm f4 lens with a B+W +2 graduated neutral density filter inside my Aquatech 5DmkII housing with a Aquatech 8″ dome port. This image is a single-exposure which required a minimal amount of processing using Aperture 3 and Photoshop CS5.

Be social and share.

Outdoor Photographer February 2012 Discover Alaska Wildlife Article

Outdoor Photographer February 2012 Discover Alaska Wildlife Article

Posted on

I was traveling all of December, so forgive me for not having posted any new blog updates for awhile. However, I am excited to share that Outdoor Photographer published my “Discover Alaska Wildlife” article in the February issue! In my article, I give lots of advice about where and how to photograph many of Alaska’s most sought after animals. I especially like the opening full page image of the lynx that I encountered while leaving Denali National Park last July. I have dedicated most of my last 5 summers to photographing Alaska, and look forward to another productive summer up north starting in May. Please let me know if you read that article and what you think.

Be social and share.

Acrylic Face Mounts

Posted on

Etheridge Dentistry Print 1

I am incredibly excited to have 2 of my new acrylic face mount prints on permanent display at Etheridge Family Dentistry in Seattle, WA. The 35×50 Laguna de los Tres Sunrise 5 print above is from my trip to Patagonia last January and the 35×50 False Clownfish 23 image below is from my trip to Raja Ampat last March. They look absolutely stunning (even with Dr Ty standing in front of them). Both of these acrylic face mounts were created by West Coast Imaging. WCI offers several paper options. I chose the Epson premium glossy paper, because it most closely matched the colors of my own Epson printer. They are mounted directly to 1/4″ acrylic, backed with a white dibond backer, a metal hanging system is attached, and the edges are flame polished. I have not finalized my price list for these spectacular prints, but they will cost about 2 to 3 times the price of my current Museo silver rag prints. To celebrate the 2011 holiday season, I will offer these ready to hang prints at the introductory price of 2 times my current print prices. It takes about 3 weeks to create them, so all orders that are placed no later than next Friday December 2 will be guaranteed to arrive in time for Christmas.

Etheridge Dentistry Print 2

Be social and share.